What Is The Purpose Of Control Joints In Concrete?
October 19, 2025
2 Min
Control joints are used to prevent random cracking in concrete. Concrete naturally expands in heat and contracts in cold, which creates stress inside the slab. Without a way to release this stress, the surface develops random zigzag cracks that weaken the structure and allow water to seep in.
By adding control joints, contractors create planned weak points in the slab. These joints guide the cracking process into straight, hidden lines instead of letting it spread randomly across the surface. This keeps the concrete strong, neat, and easier to maintain.
Why Does Concrete Crack Without Control Joints?
Concrete cracks because it naturally expands and contracts with temperature and moisture changes. The material behaves like most building materials when exposed to environmental conditions. Hot weather causes expansion while cold temperatures create contraction.
The Science Behind Concrete Movement
Concrete shrinkage begins during the curing process. As water evaporates from the concrete mix, the material contracts and creates internal tension. This tension must go somewhere. Without control joints, concrete releases this tension through random cracking.
Average concrete contracts about two-thirds of an inch per 100 linear feet when changing from wet to dry conditions. This equals the shrinkage from a 100°F temperature drop. Large concrete surfaces experience significant movement that requires careful management.
Temperature cycles create ongoing stress in concrete structures. Daily heating and cooling cause repeated expansion and contraction. Seasonal temperature changes create larger movements that accumulate over time. These movements eventually exceed concrete tensile strength.
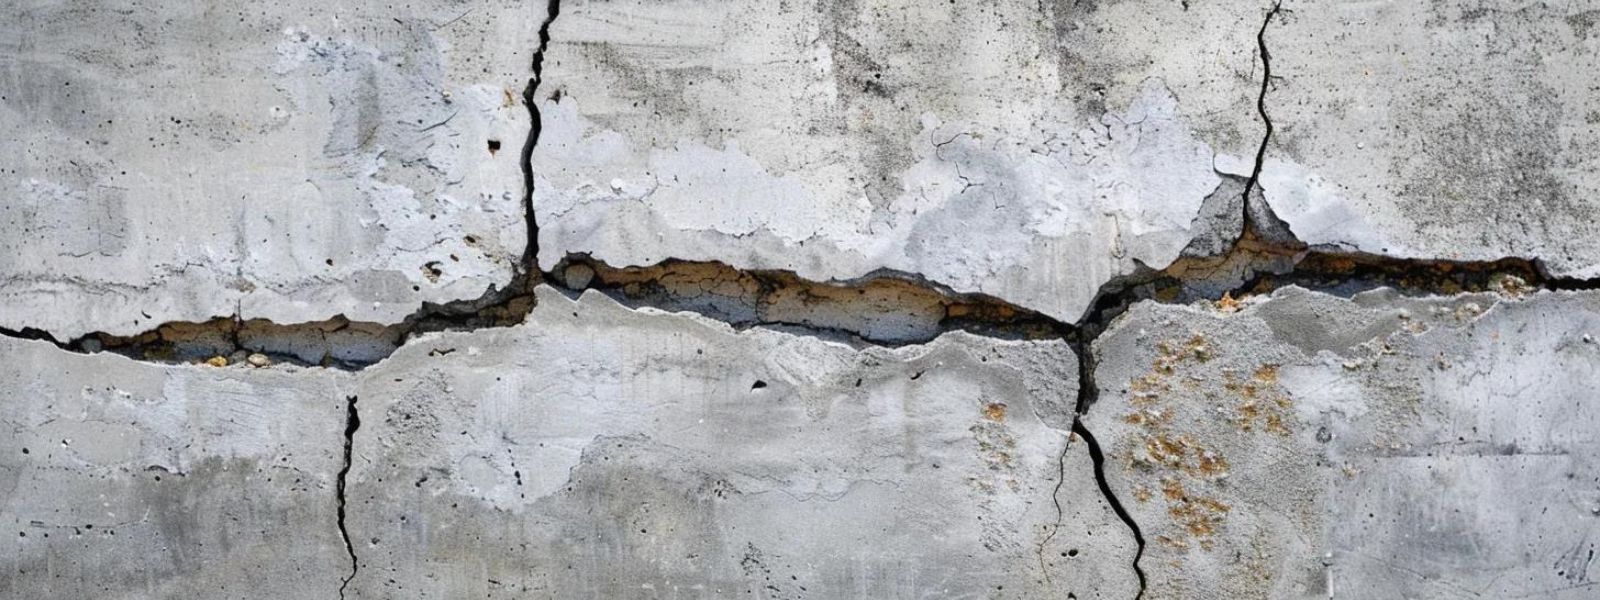
Problems Caused by Random Cracking
Random cracking creates several serious problems. Ugly zigzag patterns damage the visual appeal of concrete patios and driveways. Water infiltration through cracks causes freeze-thaw damage in cold climates. The concrete becomes weaker over time as cracks spread and widen.
Uncontrolled cracking also creates safety hazards. Trip hazards develop when crack edges become uneven. Water pooling in cracks can freeze and create slippery conditions. Property owners face expensive repair costs when random cracking damages concrete surfaces.
How Control Joints Solve These Problems
Control joints solve these problems by directing concrete to crack in predetermined locations. The concrete still experiences the same internal stresses, but these stresses concentrate at planned weak points instead of random locations.
The controlled cracking remains hidden below the surface while maintaining structural integrity. Each concrete section can move independently within its designated boundaries. This prevents stress accumulation that leads to random surface cracking.
How Do Control Joints Control Cracking?
Control joints work by creating intentional weak spots in concrete that concentrate stress during shrinkage. These weak spots guide the natural cracking process to predetermined locations. Workers create these weak points using two main methods.
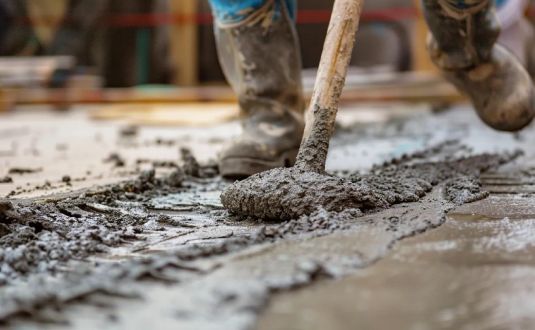
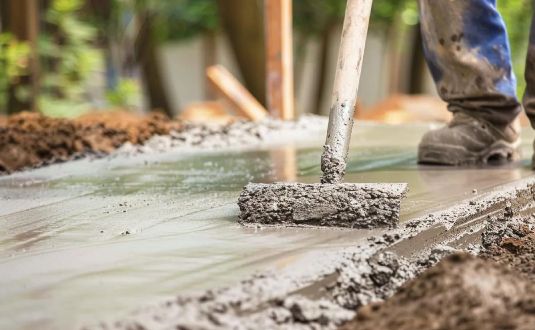
Installation During Concrete Placement
During concrete placement, workers use special grooving tools to cut V-shaped lines in fresh concrete. These tools create grooves while the concrete remains workable. The groove depth and shape determine how effectively the joint controls cracking.
Grooving tools range from 3/16 inch to 1 inch in depth capacity. The V-shaped design prevents spalling at the surface edges. Workers must time the grooving carefully to achieve proper depth without damaging the concrete surface.
Installation After Concrete Hardens
After concrete hardens, contractors use diamond-blade saws to cut precise lines into cured concrete. This method requires proper timing to prevent surface damage while creating effective weak points. The saw cuts create clean, straight lines that direct future cracking.
The groove makes concrete thinner at that specific location. When concrete shrinks, stress concentrates at the thinnest point. The concrete cracks directly under the groove, but the crack remains hidden below the surface.
Stress Concentration Mechanics
Control joint effectiveness depends on proper depth and spacing. Joints that are too shallow fail to concentrate stress effectively. Joints spaced too far apart allow random cracking between planned locations. Professional contractors understand these critical relationships.
The hidden crack under each control joint allows concrete sections to move independently. This movement prevents the buildup of stress that causes random surface cracking. Each concrete panel can expand and contract within its designated boundaries.
What Are The Different Types Of Control Joints?
Control joints fall into three main categories based on installation timing and method. Each type offers specific advantages for different concrete projects and conditions.
Tooled Joints
Tooled joints get cut while concrete remains soft and workable. Workers use metal grooving tools with V-shaped bits to create these joints. The tools range from 3/16 inch to 1 inch in depth capacity. Tooled joints work best for smaller residential projects like sidewalks and decorative concrete installations.
Tooled joints create a slightly rounded edge that some property owners prefer for aesthetic reasons. The softer appearance complements traditional concrete finishes. However, tooled joints require precise timing during installation to achieve proper depth and appearance.
Saw-Cut Joints
Saw-cut joints get cut after concrete hardens enough to prevent chipping and tearing. Contractors use concrete saws equipped with diamond blades for this process. These joints create precise, straight lines that work well for large commercial projects and concrete driveways.
Saw-cut joints offer superior accuracy and consistency compared to tooled joints. The cutting process allows contractors to achieve exact depths and straight lines. This precision becomes important for projects requiring specific aesthetic standards or structural requirements.
Early-Entry Dry-Cut Joints
Early-entry dry-cut joints use lightweight saws within 1-4 hours after concrete finishing. This method works particularly well in hot weather when concrete sets quickly. Early-entry cutting prevents random cracking that can occur when contractors wait too long to install joints.
The early-entry method requires specialized equipment and experienced operators. Timing becomes critical because cutting too early can damage the concrete surface while cutting too late allows random cracking. Professional contractors monitor concrete hardening to determine optimal cutting times.
How Do Control Joints Differ From Expansion Joints?
Control joints and expansion joints serve completely different functions in concrete construction. Many property owners confuse these two types of joints, but understanding their differences helps make better project decisions.
Control Joint Functions
Control joints control cracking during concrete shrinkage. These joints extend approximately one-quarter through concrete thickness. Workers install control joints within single concrete pours to manage internal stresses during curing and temperature changes.
Control joints focus on managing stress within individual concrete sections. The joints create predetermined crack locations but do not separate the concrete into independent pieces. Each concrete pour remains structurally connected despite having control joints.
Expansion Joint Functions
Expansion joints allow independent movement between separate concrete sections. These joints go completely through concrete thickness and get filled with flexible materials like foam, cork, or rubber. Expansion joints separate different concrete pours or create breaks between concrete and other materials.
Concrete fire pits often require expansion joints where they meet surrounding concrete surfaces. The joints allow independent thermal expansion without creating damaging forces.
Installation and Maintenance Differences
Installation timing differs significantly between these joint types. Workers must install expansion joints before concrete placement using pre-formed materials. Control joints get installed during or after concrete placement using tools or saws.
Maintenance requirements also vary between joint types. Expansion joints typically require periodic replacement of flexible filler materials. Control joints may need occasional cleaning and sealing but rarely require material replacement.
What Is The Correct Spacing For Control Joints?
Control joint spacing depends directly on concrete thickness and environmental conditions. The basic rule requires spacing joints no more than 2-3 times the slab thickness in feet. A 4-inch slab needs joints every 8-12 feet maximum.
Basic Spacing Formula
This spacing formula applies to most standard concrete applications. Thicker slabs can accommodate wider spacing because they resist cracking better than thin sections. However, environmental factors may require closer spacing even for thick concrete.
Temperature extremes affect optimal joint spacing. Areas with large daily temperature swings need closer joint spacing to manage increased movement. Concrete exposed to direct sunlight experiences greater thermal stress than shaded areas.
Environmental Factors
Moisture conditions also influence spacing requirements. Areas with high humidity or frequent rain may require different spacing than dry climates. The concrete responds differently to moisture-related expansion and contraction cycles.
Wind exposure affects concrete drying rates and may require adjusted joint spacing. Coastal areas with salt exposure need special consideration for joint design and materials.
Project-Specific Requirements
Project-specific spacing requirements vary by application. Sidewalks typically need transverse joints every 5-6 feet regardless of thickness. The narrow width of sidewalks creates different stress patterns than wide slabs.
Stamped concrete projects often integrate control joints into decorative patterns. The joint spacing must work with both structural requirements and aesthetic design elements. Skilled contractors balance these competing demands.
Panel Shape Considerations
Square panels provide the best crack control performance. Rectangular panels should have length no more than 1.5 times the width. Long, narrow panels concentrate stress at the ends and often develop cracks perpendicular to the intended joint lines.
Large concrete surfaces like parking areas require careful joint layout planning. The joint pattern must account for traffic patterns, drainage requirements, and construction logistics. Professional engineers typically design joint layouts for large commercial projects.
How Deep Should Control Joints Be Cut?
Control joints must reach one-quarter of the concrete thickness to function effectively. Shallow joints fail to create adequate weak points for stress concentration. Deep joints may compromise structural integrity while providing minimal additional benefit.
Depth Requirements by Thickness
Depth requirements scale directly with concrete thickness. A 4-inch slab requires 1-inch deep joints. A 6-inch slab needs 1.5-inch deep joints. An 8-inch slab requires 2-inch deep joints. These depths apply to both tooled and saw-cut joints.
Minimum depth requirements prevent ineffective joint installation. Functional joints need at least 3/4-inch depth regardless of slab thickness. Shallow joints provide only decorative appearance without actual crack control benefits.
Tooled vs. Saw-Cut Depth Control
Tooled joints typically achieve consistent depth more easily than saw-cut joints. The grooving tool naturally limits depth based on the bit size. Operators can feel when the tool reaches proper depth during installation.
Saw-cut joints require careful depth control during cutting. Contractors use depth guides or pre-set saw adjustments to achieve consistent results. Inconsistent depth creates weak points in some areas while leaving others vulnerable to random cracking.
Joint Width and Shape Considerations
Joint width affects crack control performance but remains less critical than depth. Narrow joints concentrate stress more effectively than wide joints. However, very narrow joints may close completely during concrete expansion.
The V-shape of tooled joints provides effective stress concentration despite wider surface openings. The narrow bottom of the V-shape creates the necessary weak point while the wider top accommodates joint movement and sealing materials.
When Should Control Joints Be Installed?
Installation timing determines control joint effectiveness and concrete surface quality. Different joint types require specific timing relative to concrete placement and hardening stages.
Timing for Tooled Joints
Tooled joints require installation while concrete remains plastic and workable. Workers typically have 1-4 hours after concrete finishing, depending on weather conditions, concrete mix design, and ambient temperature. Hot weather shortens this window while cool conditions extend it.
Signs that concrete is ready for tooling include surface firmness without excessive bleeding or surface water. The concrete should support the weight of workers and tools without leaving deep impressions. Surface texture should feel slightly rough rather than smooth and wet.
Timing for Saw-Cut Joints
Saw-cut joints need installation after concrete hardens enough to prevent surface tearing and raveling. Hot weather requires cutting within 6-12 hours after finishing to prevent random cracking. Cool weather allows longer waiting periods.
Proper saw-cutting timing requires monitoring concrete hardening progress. Test cuts in inconspicuous areas help determine readiness. Clean edges without tearing or chipping indicate proper timing. Rough or damaged edges suggest the concrete needs more curing time.
Environmental Influences on Timing
Weather conditions significantly affect optimal timing for all joint types. High temperatures and low humidity accelerate concrete hardening. Cold temperatures and high humidity slow the hardening process. Wind increases surface drying and may require adjusted timing.
Concrete mix design also influences timing requirements. Mixes with accelerators harden faster and require earlier joint installation. Retarder admixtures slow hardening and extend the installation window. Contractors adjust timing based on specific mix properties.
What Are Common Control Joint Installation Mistakes?
Poor joint layout and installation timing cause the majority of control joint failures. Understanding common mistakes helps property owners evaluate contractor competence and project quality.
Layout and Design Mistakes
Wrong panel shapes create stress concentration at corners and edges. Joint layouts must create small, square panels whenever possible. Long, narrow panels concentrate stress at the ends and often develop cracks perpendicular to joints. L-shaped and T-shaped panels create multiple stress concentration points.
Discontinuous joints fail to provide effective crack control across entire concrete surfaces. Control joints must run completely across slabs without offsets or interruptions. Staggered or offset joints concentrate stress at termination points and allow random cracking.
Installation Timing Errors
Late cutting allows random cracking before joint installation. Contractors who wait too long lose the opportunity to direct cracking to planned locations. Random cracks that develop before joint cutting often continue growing despite subsequent joint installation.
Insufficient depth prevents joints from creating effective weak points. Shallow cuts may appear adequate but fail to concentrate stress during concrete movement. The concrete cracks randomly instead of following the planned joint lines.
Quality Control Issues
Improper spacing allows stress buildup between joints. Widely spaced joints cannot control all movement within large concrete panels. Random cracks develop at mid-span locations where stress exceeds concrete tensile strength.
Poor surface preparation affects joint quality and longevity. Dirty or contaminated surfaces prevent proper tool operation and create rough joint edges. Clean surfaces produce better joint appearance and performance.
How Do Control Joints Work With Different Concrete Applications?
Different concrete applications require specific control joint approaches based on size, thickness, and intended use. Understanding these variations helps optimize joint design for specific projects.
Residential Applications
Concrete driveways typically use saw-cut joints spaced 10-12 feet apart for 4-inch thickness. Joints run perpendicular to the length direction to control shrinkage cracks. Wide driveways may require longitudinal joints down the centerline.
Driveway joints must accommodate vehicle traffic loads without creating ride quality problems. Smooth joint edges prevent tire impact damage. Proper joint sealing prevents water infiltration that can cause subgrade problems.
Residential sidewalks use tooled joints every 4-6 feet to create pleasing visual proportions. The closer spacing accommodates the narrow width and provides better crack control. Joint depth follows the quarter-thickness rule despite the frequent spacing.
Specialized Outdoor Applications
Garden walls and retaining structures require control joints at specific intervals based on height and reinforcement. Taller walls need closer joint spacing to manage greater thermal movement. Reinforced walls may allow wider spacing.
Outdoor kitchen concrete counters and surfaces need control joints integrated with design elements. The joints must provide crack control without interfering with food preparation areas. Sealed joints prevent contamination and maintain sanitary conditions.
Commercial and Industrial Applications
Commercial floor slabs follow different spacing rules based on structural requirements and intended use. Industrial floors with heavy equipment loads may require closer joint spacing. Office building floors with lighter loads can use standard residential spacing.
Large plaza and parking areas require engineered joint layouts that account for drainage patterns and traffic flow. Joint locations must not interfere with storm water management or create maintenance problems. Professional engineers design these systems.
How Should Control Joints Be Maintained Over Time?
Proper maintenance extends control joint life and preserves concrete appearance. Neglected joints allow water infiltration and may lose effectiveness over time.
Regular Cleaning and Inspection
Joint cleaning removes debris that can prevent proper movement and create stress concentrations. Leaves, dirt, and ice must be removed regularly to maintain joint function. Pressure washing effectively cleans joints without damaging concrete surfaces.
Regular inspection identifies problems before they become serious. Hairline cracks near joints may indicate inadequate depth or spacing. Wide joints may suggest excessive concrete movement or subgrade settlement.
Joint Sealing and Protection
Joint sealing prevents water infiltration that can cause freeze-thaw damage and subgrade problems. High-quality polyurethane sealants provide flexible sealing that accommodates joint movement. Sealant replacement typically occurs every 5-10 years depending on climate conditions.
Sealant selection affects longevity and appearance. Self-leveling sealants work well for joints with minimal movement. Non-sag sealants perform better for joints that experience significant movement. Color-matched sealants provide better appearance than contrasting colors.
Seasonal Maintenance Requirements
Winter protection becomes critical in freeze-thaw climates. Ice formation in unsealed joints can create expansion forces that damage concrete. Pre-winter joint inspection and sealing prevent most cold-weather problems.
Professional maintenance services understand proper cleaning and sealing techniques. DIY joint maintenance often uses inappropriate materials or methods that reduce effectiveness. Professional services typically cost less than concrete replacement.
Frequently Asked Questions
Do all concrete slabs need control joints?
Yes, all concrete slabs larger than 6 square feet need control joints to prevent random cracking. Small concrete sections like stepping stones may not require joints due to their limited size. Large slabs without joints will develop random cracks within the first year.
Can you add control joints to existing concrete?
Control joints can be added to existing concrete using diamond blade saws. The process works best on concrete less than 5 years old before extensive cracking develops. Existing cracks may continue growing even after joint installation.
What happens if control joints are too shallow?
Shallow control joints fail to concentrate stress and allow random cracking. Joints less than one-quarter of slab thickness provide only decorative appearance. The concrete cracks randomly instead of following the planned joint lines.
How much do control joints cost to install?
Control joint installation costs range from $2-6 per linear foot depending on method and project size. Tooled joints cost less than saw-cut joints. Large projects typically receive lower per-foot pricing than small residential jobs.
Should control joints be sealed?
Control joints should be sealed in freeze-thaw climates and high-traffic areas. Sealing prevents water infiltration and debris accumulation. Interior floors and covered areas may not require sealing depending on conditions.
Can control joints be repaired if damaged?
Damaged control joints can be repaired by cleaning and re-cutting to proper depth. Severely damaged joints may require complete reconstruction. Professional evaluation determines the best repair approach for specific damage types.
Final Thoughts
Control joints prevent random cracking by creating planned weak points that direct concrete movement to predetermined locations. Proper spacing equals 2-3 times the slab thickness in feet for most applications. Joint depth must reach one-quarter of concrete thickness to concentrate stress effectively.
Installation timing varies by method but remains critical for joint effectiveness. Tooled joints require installation while concrete remains workable. Saw-cut joints need installation after hardening but before random cracking occurs.
Professional installation provides optimal results for all concrete applications. Experienced contractors understand local climate conditions, proper timing, and installation techniques. Quality installation prevents costly concrete replacement and maintains property appearance.
Regular maintenance extends joint life and preserves concrete integrity. Cleaning, sealing, and periodic inspection prevent most joint-related problems. Professional maintenance services often provide better results than DIY approaches.
C30 concrete is about 20% stronger than C25, so it handles heavier loads and tougher conditions with less cracking. C25 works great for most Huntsville driveways, patios, and sidewalks, while C30 is better for foundations, retaining walls, RV parking areas, and high-stress slabs where Alabama clay soil and weather can cause shifting over time.
Glass fiber reinforced concrete offers major benefits like higher tensile strength, better crack control, lighter weight, and long-term durability. The fibers create internal reinforcement throughout the slab, helping concrete resist stress, shrinkage, and weather damage, making it ideal for driveways, patios, and outdoor projects in North Alabama.
Fiberglass improves concrete strength by adding tiny fibers that reduce cracking and help the slab hold together under stress. It boosts durability, impact resistance, and shrink control, making it a smart choice for driveways, patios, and high-traffic concrete in Alabama weather.
The cheapest ways to level a concrete slab are grinding (for small high spots) and mudjacking (for sunken slabs). Self-leveling compound is also affordable for shallow indoor dips, and polyurethane foam injection can be cost-effective for small areas where you want a longer-lasting lift.

.png)
.png)
.png)

.png)

.webp)

.webp)